Edit Training Event Calendar
To edit event, click a training event on the calendar then the following page will appear.
Follow these steps to edit data of training event:
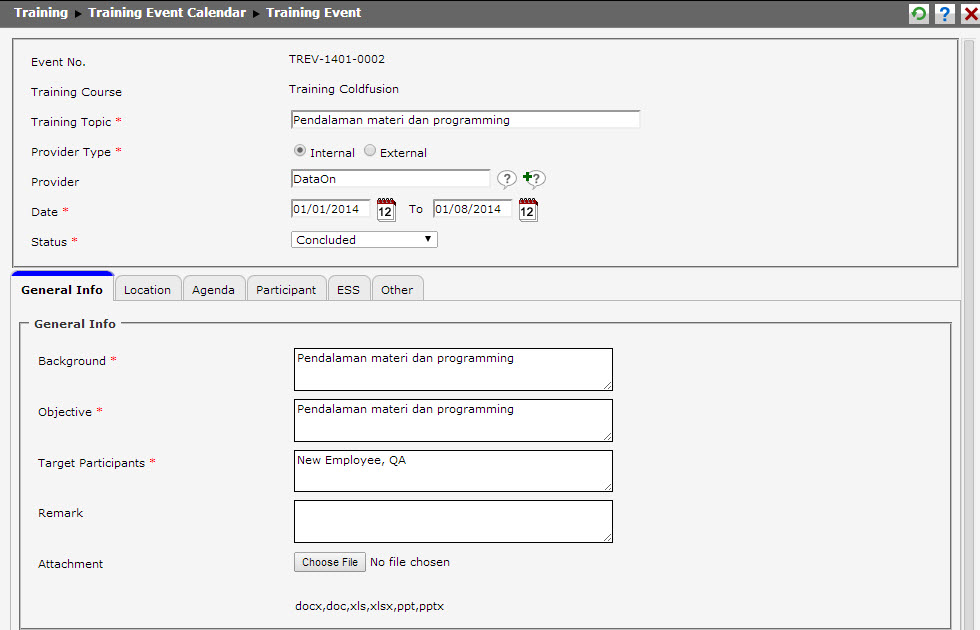
- Event No.: The event number will be generated automatically from the system after user clicks
 .
. - Training Course: Choose one of training courses by clicking
 and selecting the course from the available options. The options appeared here is configured in Training > Training Course > Training Course List.
 - Training Topic: Edit the topic of training that will be held by the company.
- Provider Type: Determine provider type of the training that will be held. There are two provider types, internal and external. Internal means that the provider is derived from within the corporate environment or directly from the company itself. External means that the provider is derived from outside the corporate environment.
- Provider: Edit the name of training provider by clicking and choosing the provider name from the available options. The options of provider name appeared here are based on the provider type selected before. If user chooses provider type of internal, then only the names of internal provider appear on the options. If user chooses external, then only the names of external provider appear on the options. User can also add provider name list by clicking
 and filling the form of Add Training Provider.
 - Date: Determine the start date and end date of training by clicking
 and choosing the dates from the calendar appeared.
 - Status: Determine the status of training. There are five status options:
- Draft: It is the status for training which is still saved as a draft and has not been published yet to training participant.
- Open for Registration: It is the status for training which has been published to the employees who want to register to be training participant.
- Closed Registration: It is the status for training of which registration has been closed.
- Concluded: It is the status for training that has been held.
- Cancelled: It is the status for training that is cancelled.
In this page, there are six additional tabs needed to be completed:
1. General Info
Click General Info tab then the following page will appear.
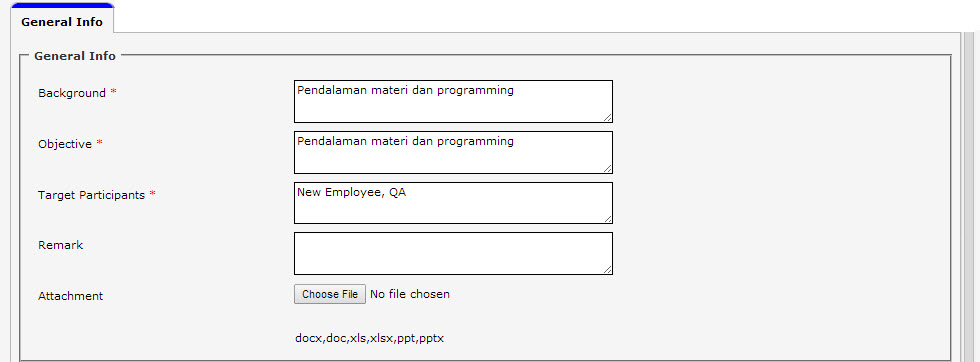
Follow these steps to complete the data in General Info tab:
- Background: Input background of the training. For example, background of Sunfish Training is introducing and understanding Sunfish system.
- Objective: Input the objective of training. The objective here is the purpose or target for the participant after participating the training. For example, the objective of Database Training is helping the participant to work and be more understand about the database.
- Participant Target: Input the target of participant that will participate the training. For example, Sunfish Introduction Training which is intended for the new employee, then the participant target of thos training is new employee.
- Remark: Input remark of the training. Remark functions as the complementary information of the training.
- Attachment: Upload the attachment if needed by clicking
 and locating the attachment file. Upload the attachment according to the determined file format. The file formats allowed here are docx, pptx, xlsx, ppt, doc, and xls.
2. Location
Click Location tab then the following page will appear.
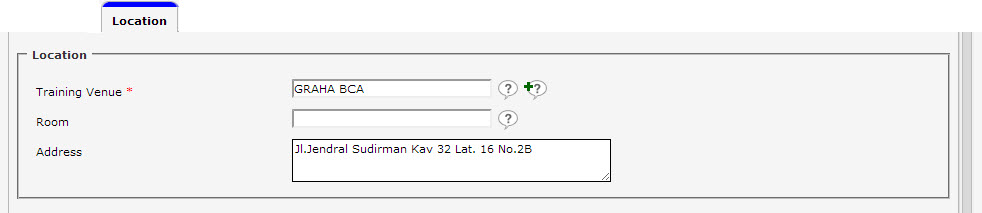
Follow these steps to complete the data in Location ta:
- Training Venue: Input the venue where the training will be held by clicking and selecting the venue from available options. The options appeared here are configured in Setting > Training Setting > Training Venue. User can also add training venue option in this menu by clicking and filling the form of Add Training Venue.
- Room: Input the room that will be used for the traiing by clicking and selecting the room from available options. The options appeared here are configured in [helplink; hrm.setting.training.venue.add]Setting > Training Setting > Training Venue > Add Training Venue[/helplink].
- Address: Input the address of training venue. If user has inputted the address in Setting > Training Setting > Training Venue, then the address textfield will be automatically filled user when chooses the training venue.
3. Agenda
Click Agenda tab then the following page will appear.
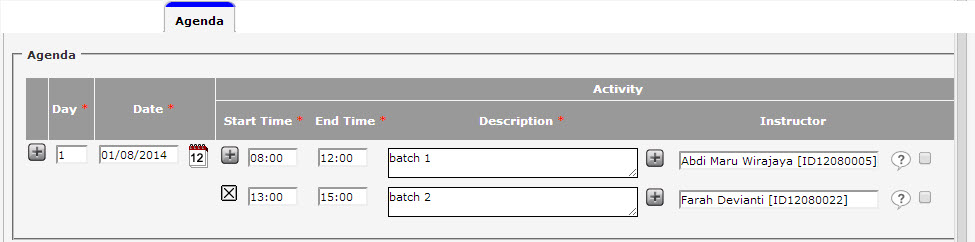
Follow these steps to complete the data in Agenda tab:
- Day: Determine the day total of training. Click
 to add more days if the training is held in more than one day. Click
  to delete the day that has been added.
 - Date: Determine the date of training by clicking and selecting the date from calendar appeared. The date inputted here must be in accordance with period of training.
- Start Time: Input the start time of training.
- End Time: Input the end time of training.
- Description: Input the description of training event done in referred session.
- Instructor: Determine the instructor of training by clicking and selecting the instructor from available options. The list of instructor appeared here is according to the provider type selected previously. If user selects provider type of internal, then the list of instructor appeared here is the names of all employees in the company. If user selects provider type of external, then the list of instructor appeared here is the names of instructor from outside the company. The external instructor names are derived from Setting > Training Setting > Training Instructor. User can add the external instructor name in this tab by clicking and filling the form of Add Training Instructor, user can also add more than one name by clicking .
On Activity column, user can add total of training session by clicking beside the textfield of Start Time. User can also delete the total of session that has been added by clicking .
4. Participant
Click Participant tab then the following page will appear.
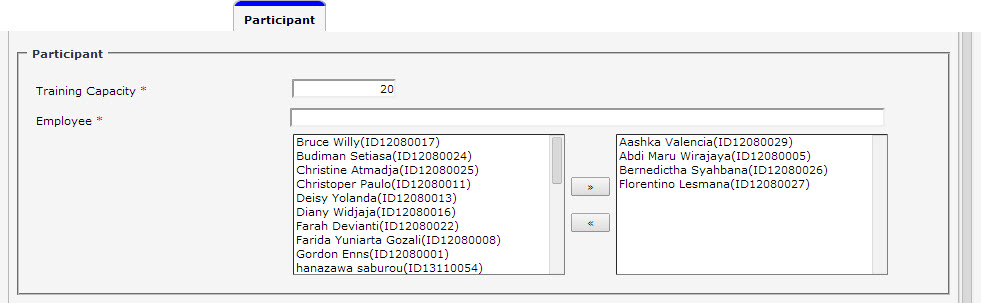
Follow these steps to complete the data in Participant tab:
- Training Capacity: Input the capacity of training participant to determine the maximum total of participant allowed to take the training session.
- Participant: Determine the training participant by moving selected employee from the left box to the right box by clicking
 , and vice versa clicking
  to move back the participant name from the right box to the left box. User can also search certain employee name to be selected by typing the name on the textfield above the left box as the following;

Or, by clicking if user wants to filter employee specifically as the following example.
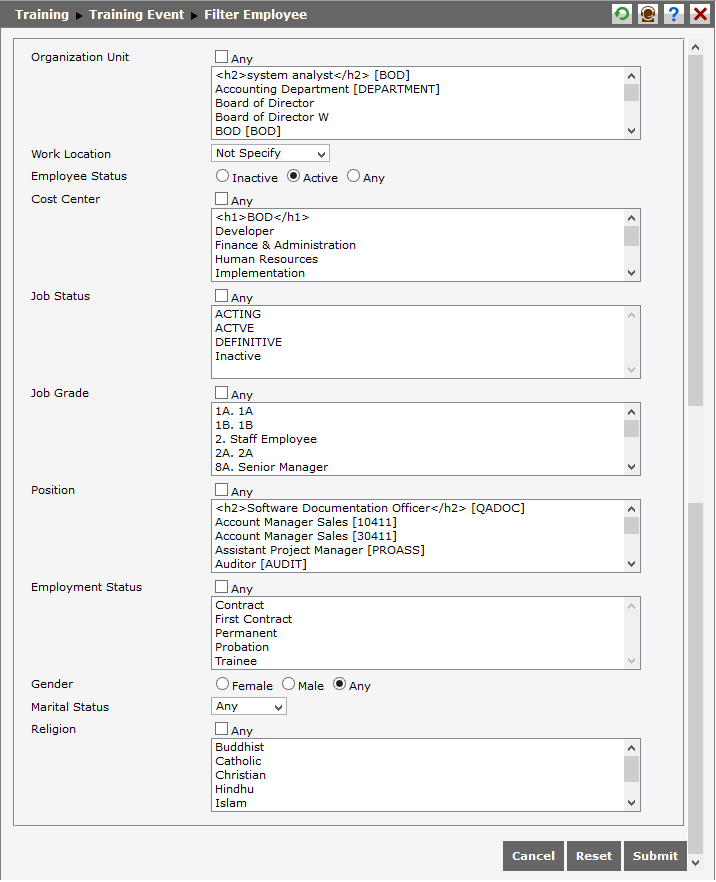
User can choose which criteria used to filter employee names appeared on the options, then click. So that the employee names appeared on the options are in accordance with the selected criteria.
5. ESS
Click ESS tab then the following page will appear.

Follow these steps to complete the data in ESS tab:
- Enable Training Content Access: Select "Yes" if user wants to access the training material.
- Training Content Access Date: Determine the period of training material access by clicking and selecting the start date and end date from the calendar appeared. User cannot access the material exceeding the determined period.
- Enable Feedback: Select "Yes" to enable participant giving the feedback to the training that has been participated.
- Feedback Due Date: Determine the due date for participant giving the feedback to the training that has been participated by clicking and selecting the date from the calendar appeared. For example, feedback due date is 2 February 2014, then the participant can only give the feedback until 2 February 2014, and the participant cannot give the feedback exceeding this date.
- Enable Evaluation: Select "Yes" to enable trainer or Training Manager is able to give the training participant evaluation after the participant participated the training held by company.
6. Other
Click Other tab then the following page wil appear.
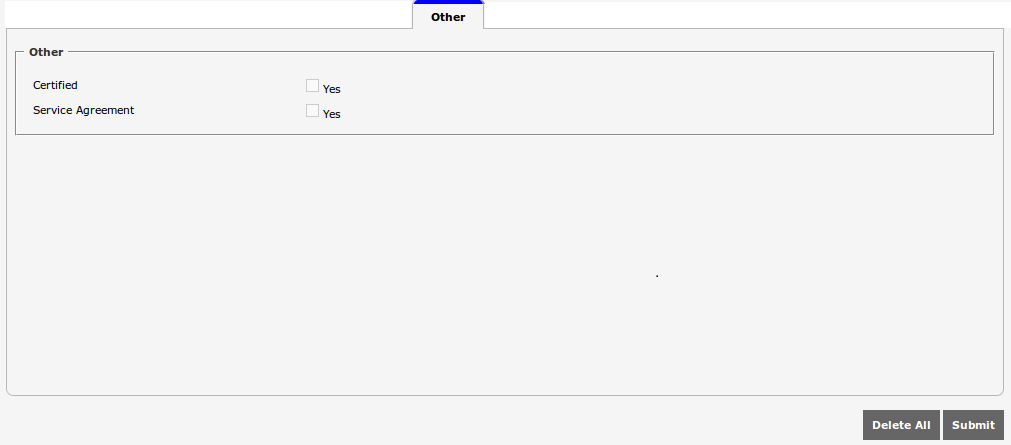
Follow these steps to complete the data in Other tab:
- Certified: Select "Yes" if there is certification of the training, or leave it deselected if there is no certification of training.
- Service Agreement: Select "Yes" if there is service agreement, or leave it deselected if there is no service agreement.
After editing the data, click ![]() to save the changes. Click
to save the changes. Click  to delete the training event. But for the training with status "Concluded" cannot be deleted.